Rain gardens and bioswales in Lincoln: how stormwater design actually works
What rain gardens and bioswales do, how to size and place them on heavy Nebraska soils, which plants handle both flooding and drought, and the design mistakes students (including me) make most often.

By Matthew Bovee · Upd. · 8 min
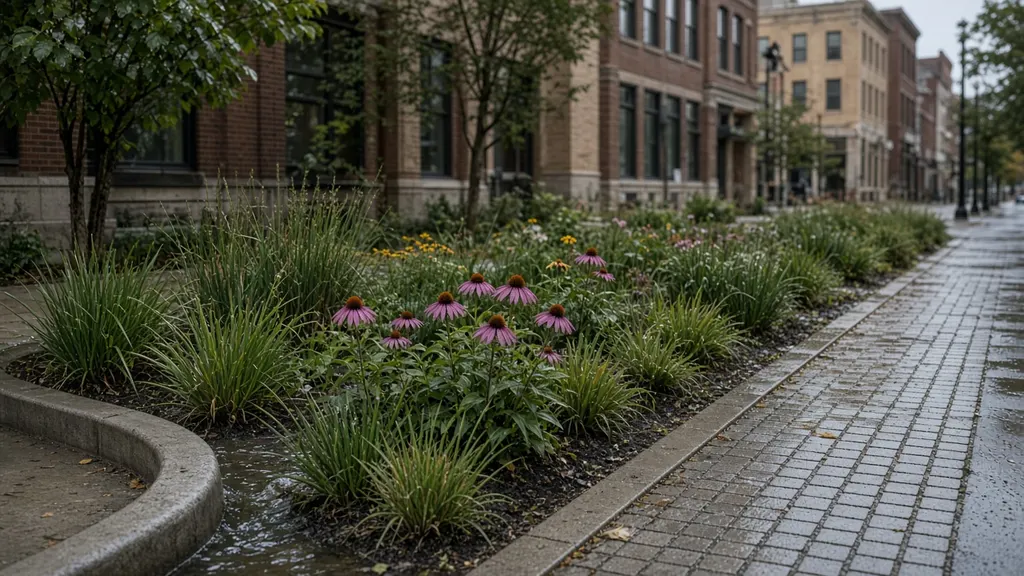
Every time it rains hard in Lincoln, water runs off roofs, driveways, streets and parking lots, picks up whatever is lying on those surfaces and heads toward the nearest storm drain. From there it moves into local creeks. Conventional drainage is designed to move that water away as fast as possible. Green stormwater infrastructure tries to do the opposite: slow it down, spread it out and let it soak in close to where it falls.
Rain gardens and bioswales are the most common tools for that job, and they show up in almost every studio project I have worked on. They are also easy to draw badly. A blue-green blob on a plan labeled "rain garden" looks responsible, but whether it works depends on soil, grading, sizing, plants and maintenance. This article explains what I have learned about each of those, with a focus on conditions in and around Lincoln.
What is the difference between a rain garden and a bioswale?
The terms are sometimes used loosely, but the basic difference is about movement.
- A rain garden is a shallow, planted depression that collects runoff and holds it while it soaks into the ground. Water comes in, pauses and infiltrates.
- A bioswale is a planted channel that conveys water from one place to another while slowing it, filtering it and letting some of it soak in along the way. Water comes in, moves through and leaves more slowly and cleaner.
Both rely on plants and soil to do the work. Roots open up the soil so water can enter it, plants slow the flow and soil microorganisms help break down some pollutants.
| Rain garden | Bioswale | |
|---|---|---|
| Shape | Shallow bowl | Long, gently sloped channel |
| Main job | Hold and infiltrate | Convey, slow and filter |
| Typical place | Downspouts, yards, small courtyards | Parking lots, streets, along walks |
| Outlet | Overflow for big storms | Continues to a drain or another feature |
Why heavy soils change the design
Many soils around Lincoln drain slowly. That does not rule out rain gardens, but it changes the design. If water cannot soak in within a reasonable time, the garden stays wet too long, plants suffer and mosquitoes become a concern. Most guidance aims for ponded water to drain within about a day or two.
The first step is always a drainage test where the feature will go. Dig a hole to the depth of the planned basin, fill it with water, let it drain, fill it again and time how fast the water level drops. Slow results mean one of three responses:
- Make it bigger and shallower. More surface area and less depth means water spreads out and infiltrates over a wider area.
- Amend the soil. Engineered soil mixes with more sand and organic matter can improve infiltration in the root zone, but they need to be specified carefully.
- Add an underdrain. A perforated pipe below the soil can carry excess water away once the soil is saturated. This turns a pure infiltration feature into a filter that still slows and cleans water.
Placing a rain garden
Location decides more than plant choice. Some rules of thumb I follow:
- Keep it away from foundations. Infiltrating water next to a basement is a bad idea. Most guidance suggests placing rain gardens at least ten feet from a building.
- Use the natural grade. Water should reach the garden by gravity, usually through a swale, a downspout extension or a curb cut.
- Avoid utilities, septic systems and steep slopes. Steep sites need terracing or a different strategy.
- Plan for overflow. Every rain garden will eventually fill. The design must show where water goes next, and that path should be safe.
Sizing: the honest version
In studio, sizing is often done with a simple ratio: the garden should be a certain percentage of the drainage area it receives, adjusted for soil type and depth. Those rules are useful as a starting point, but I have learned to treat them as estimates, not answers. Real sizing depends on local design storms, soil tests and the goals of the project, and it is usually checked by a civil engineer.
What students can do well is show the logic clearly: which surfaces drain to which feature, roughly how large each drainage area is and how the feature handles a typical storm versus a large one. A clear drainage diagram is often more convincing in a review than a precise-looking number with no explanation.
Map the drainage areas
Outline every roof, walk and paved surface and show which way water flows from each.
Choose feature types
Hold-and-infiltrate where soils allow; convey-and-filter where space is long and narrow.
Estimate size
Use a simple ratio as a starting point and adjust for soil tests and depth.
Design the overflow
Show the path water takes when the feature is full.
Plan maintenance
Note who weeds, clears inlets and checks after storms.
Plants that handle both flood and drought
The hardest thing about rain garden plants is that they need to tolerate opposite conditions. The bottom of a basin may sit under water after a storm and then bake dry for weeks in July. The sides and rim get wet less often.
I think about three planting zones:
- Bottom: plants that tolerate periodic standing water and drought — many sedges, rushes and moisture-tolerant prairie plants.
- Side slopes: plants that like average moisture and can handle occasional wetting.
- Rim and edges: tougher, drought-tolerant plants, often the same prairie species used elsewhere on the site.
Dense planting matters more than any single species. Roots are what keep the soil open, and full coverage keeps weeds out. Native plants with deep root systems, many of them from the prairie communities I describe in using tallgrass prairie as a design reference, are well suited to this.
Bioswales along parking lots and streets
Parking lots are where bioswales earn their keep. A lot sheds water quickly and that water picks up oil, sediment and debris. A swale along the edge or in a landscaped island catches it before it reaches a drain.
Details make or break these features:
- Curb cuts must be wide enough and placed at low points, or water will bypass them.
- Inlet protection with stone slows water entering the swale and keeps it from washing out soil and plants.
- Sediment will collect at inlets. Design a small forebay or an area that is easy to clean.
- Salt from winter de-icing ends up in the swale. Choose salt-tolerant plants near inlets.
One of my studio projects explored retrofitting a large lot with a series of bioswales, and most of what I learned came from these details rather than the big moves.
Planting zones inside a stormwater feature
A rain garden is not one environment but several. The bottom of the basin may hold water for a day after a storm and then dry out for weeks. The side slopes are wet only briefly. The rim and surrounding area behave like any other garden bed, except that they may also catch salt and sediment from nearby pavement.
I plan planting in three bands:
- Bottom: species that tolerate both brief flooding and long dry spells. Many native sedges, rushes and moisture-tolerant prairie plants fit here.
- Slopes: deep-rooted grasses and forbs that hold soil and handle short periods of saturation.
- Rim and edge: tough, often shorter plants that frame the feature, tolerate foot traffic nearby and give a clear, tidy edge.
Using the same species across all three bands is one of the most common reasons rain gardens look patchy after a couple of years: plants suited to the rim drown at the bottom, and plants suited to the bottom dry out on the rim.
Inlets, outlets and the path of water
Every stormwater feature needs a clear answer to three questions: how does water get in, where does it spread, and where does it go when the feature is full? Many problems come from small details at these transitions.
- Inlets should be at real low points and protected with stone or another energy-dissipating surface so incoming water does not scour the soil.
- Forebays — small areas at the inlet that catch sediment and trash — make cleaning simple and protect the planting.
- Overflows should send excess water somewhere safe, such as an existing storm inlet, a downstream swale or a stable lawn area.
Drawing arrows for water flow across the whole site, before drawing any gardens, makes these details much easier to get right. It is the same habit I describe in site analysis before you draw.
Mistakes I made (so you do not have to)
The rain garden in my first project was beautiful, enormous and uphill from everything that was supposed to drain into it.
- Drawing features where water does not go. Always check grades and flow arrows before placing a feature.
- Making it too deep. Deep basins drain slowly on heavy soils and become hazards near walks.
- Ignoring maintenance. A swale full of sediment and weeds stops working. Design for access.
- Forgetting winter. Snow piled into a swale can bury plants and bring a lot of salt. Decide where snow goes.
- Picking plants for looks only. Every plant in the basin needs to survive both standing water and drought.
Why it matters in Lincoln
Lincoln's creeks receive water from a lot of hard surfaces. Small features spread across a neighborhood or campus can reduce how much runoff reaches those creeks during smaller storms, and they bring plants and habitat into places that were only pavement. They also make drainage visible, which helps people understand how their streets and yards connect to the larger watershed. That connection is the subject of my article on designing trails and edges along Lincoln's creeks.
A short checklist for student projects
- Drainage areas are mapped and flow arrows are drawn.
- Each feature is labeled as hold-and-infiltrate or convey-and-filter.
- Soil conditions are noted, with a strategy for slow drainage.
- Overflow paths are shown.
- Planting is zoned for wet bottoms and dry rims.
- Inlets, sediment and salt are addressed.
- Maintenance access and responsibility are noted.
Stormwater design is one of the places where landscape architecture is most clearly useful, and it rewards careful thinking more than flashy drawings. If you are working through a similar project and want to compare approaches, you can reach me here.
Last updated
Keep reading
Keep reading
7 min
Public space
Designing public space for Nebraska wintersHow to design plazas, streets and small parks in Lincoln that stay useful and attractive from November to March: sun, wind shelter, snow storage, materials, lighting, planting and programming for cold months.
7 min
For students
Site analysis before you draw: how to read a site in LincolnA step-by-step approach to site analysis for landscape architecture students: what to observe, how to document sun, wind, water, soils, circulation and use, and how to turn notes into diagrams that shape a design.
7 min
For students
How to build a landscape architecture student portfolio that shows how you thinkA practical guide for landscape architecture students: choosing projects, structuring case studies, showing process as well as finished drawings, writing captions, and keeping a portfolio honest and easy to read.